ShopDreamUp AI ArtDreamUp
Deviation Actions


Suggested Deviants


Suggested Collections


You Might Like…


Description
I've had a number of requests to explain how I do my portraits So here goes -- please be kind. (This is my first time doing this type of tutorial.) Now, to make matters easier, I chose a digitally done portrait because that was what I was working on at the moment. My traditional realist-styled work -- from the ink sketches to the pastels usually involve a similar technique.
(This'll be a straight render -- with not too much on the interpretation side of things. There'll be some but not too much.)
The nice thing is that I'm so used to working this way that I work pretty rapidly on a piece using this sort of technique. (Smile)")
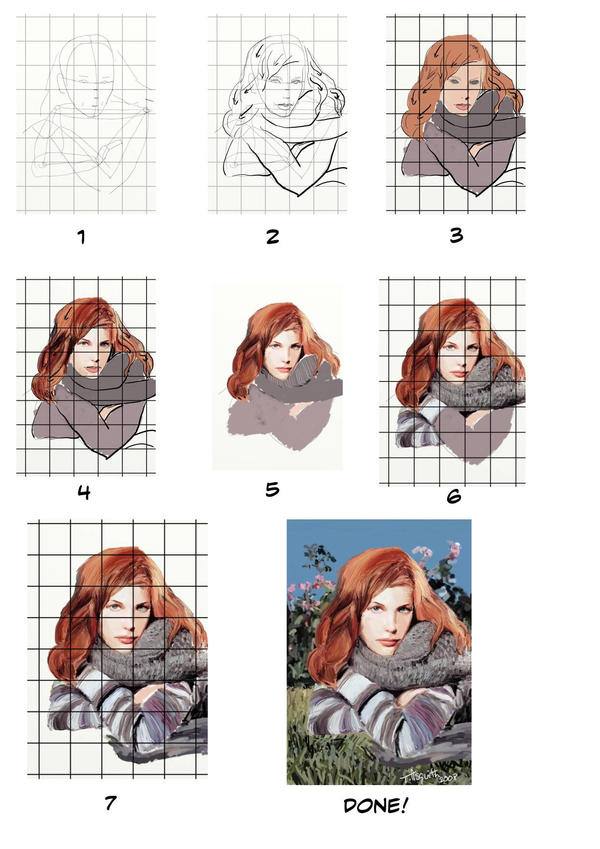
PREPARATION
Now, before I start, I gather together what I need -- my drawing/painting materials, a reference ( [link] ) and one of my graticolas/Durer grids. You can buy them commercially but being the cheapskate that I am, I just copied them onto some acetate transparencies that I picked up at the nearest Staples. The squares can range in size from 1cm x 1cm to 4cm x 4cm depending on the amount of detail and the size of the piece I'm trying to interpret.
After that is done, I overlay the grid on my original and create another one on either my drawing page or my screen. Here, I uploaded the grid as a layer on Artrage. I then leave this grid alone -- only turning it on and off to help me with the perspective and measures of the piece.
Step 1: On a layer above the grid, I work out the placement of the skull, torso and arms. Once that is done, I measure out the placement of the eyes, nose and mouth using the grid as a guide. (Note: The grid I was working from had smaller squares allowing me to measure this out even easier. (REMEMBER: for greater detail, use a smaller grid.)
I also rough out the hair and eyebrows.
Step 2: On a new layer, I now work out Liv's features by roughly fleshing out the skeleton and reworking the parts of the face. I overlay the hair making note of the flow of the hair -- hence the reason for the arrows. Note that the ears are included in Steps 1 and 2 to help give me a sense of direction for the face (even though they don't appear in the final piece).
Step 3: On another new layer, I now put in the flats using Artrage's crayon tool -- approximating some of the colours I found in the original and start planning out the shaded areas. Taking a leaf from Greg Horn, I too like to darken the eyes and then apply lighten colours. (I find it helpful when I start to round out the eyes.)
Step 4: Keeping with the head, shading and hues are added in a chunky manner. The hair itself is conceived in portions to assist me in adding the appropriate colours. Eyes are worked out as is the nose.
Step 5: Hair is refined further - lips are roughly shaped. (I turn off the grid at this point to give me a sense of how the work is going. Grids are great at helping you focus on small parts -- but they make it much harder to see the grand scheme.)
I also do the outlines of the face in warm greys and flesh tones.
(You can also see that I was trying to work out how to do the scarf at this point. )
Step 6: Turning the grid back on, I now start moving away from the face and start to fill in the clothing. (A knit pattern at a lower resolution can be emulated quite nicely by carefully adding small lines in close proximity, following the flow along the fabric.)
I also went back and tinkered with the highlights a little. (At this point, I am still not entirely happy with the lower parts of the hair though.)
Step 7: Fill in more of the fabric - at this point, I decide that I no longer need my skeleton. I add the part of the scarf which is lying on the ground. I keep the sweater a bit on the rough side texture-wise.
As I move to the next step, I go back to the face for one last cleanup around the mouth, lips (and philtrum) and the forehead.
I also cleanup the hand and the gaps around the figure to make sure that the background I'm adding will not show through the figure.
Step 8: I now switch from the pen and the crayon which I've used up til now and move to the paintbrush (which is now set to autodry).
The original photo had a simple background -- some grass and a floral backdrop against a sky. This was done using three colours for the grass, three colours for the green of the flowers with a simple pink for the flowers. The sky itself was a uniform cyan.
After that, I give the piece one last check and then sign my name.
Done.
Tools: Artrage (pencil, crayon, paintbrush)
(This'll be a straight render -- with not too much on the interpretation side of things. There'll be some but not too much.)
The nice thing is that I'm so used to working this way that I work pretty rapidly on a piece using this sort of technique.
PREPARATION
Now, before I start, I gather together what I need -- my drawing/painting materials, a reference ( [link] ) and one of my graticolas/Durer grids. You can buy them commercially but being the cheapskate that I am, I just copied them onto some acetate transparencies that I picked up at the nearest Staples. The squares can range in size from 1cm x 1cm to 4cm x 4cm depending on the amount of detail and the size of the piece I'm trying to interpret.
After that is done, I overlay the grid on my original and create another one on either my drawing page or my screen. Here, I uploaded the grid as a layer on Artrage. I then leave this grid alone -- only turning it on and off to help me with the perspective and measures of the piece.
Step 1: On a layer above the grid, I work out the placement of the skull, torso and arms. Once that is done, I measure out the placement of the eyes, nose and mouth using the grid as a guide. (Note: The grid I was working from had smaller squares allowing me to measure this out even easier. (REMEMBER: for greater detail, use a smaller grid.)
I also rough out the hair and eyebrows.
Step 2: On a new layer, I now work out Liv's features by roughly fleshing out the skeleton and reworking the parts of the face. I overlay the hair making note of the flow of the hair -- hence the reason for the arrows. Note that the ears are included in Steps 1 and 2 to help give me a sense of direction for the face (even though they don't appear in the final piece).
Step 3: On another new layer, I now put in the flats using Artrage's crayon tool -- approximating some of the colours I found in the original and start planning out the shaded areas. Taking a leaf from Greg Horn, I too like to darken the eyes and then apply lighten colours. (I find it helpful when I start to round out the eyes.)
Step 4: Keeping with the head, shading and hues are added in a chunky manner. The hair itself is conceived in portions to assist me in adding the appropriate colours. Eyes are worked out as is the nose.
Step 5: Hair is refined further - lips are roughly shaped. (I turn off the grid at this point to give me a sense of how the work is going. Grids are great at helping you focus on small parts -- but they make it much harder to see the grand scheme.)
I also do the outlines of the face in warm greys and flesh tones.
(You can also see that I was trying to work out how to do the scarf at this point. )
Step 6: Turning the grid back on, I now start moving away from the face and start to fill in the clothing. (A knit pattern at a lower resolution can be emulated quite nicely by carefully adding small lines in close proximity, following the flow along the fabric.)
I also went back and tinkered with the highlights a little. (At this point, I am still not entirely happy with the lower parts of the hair though.)
Step 7: Fill in more of the fabric - at this point, I decide that I no longer need my skeleton. I add the part of the scarf which is lying on the ground. I keep the sweater a bit on the rough side texture-wise.
As I move to the next step, I go back to the face for one last cleanup around the mouth, lips (and philtrum) and the forehead.
I also cleanup the hand and the gaps around the figure to make sure that the background I'm adding will not show through the figure.
Step 8: I now switch from the pen and the crayon which I've used up til now and move to the paintbrush (which is now set to autodry).
The original photo had a simple background -- some grass and a floral backdrop against a sky. This was done using three colours for the grass, three colours for the green of the flowers with a simple pink for the flowers. The sky itself was a uniform cyan.
After that, I give the piece one last check and then sign my name.
Done.
Tools: Artrage (pencil, crayon, paintbrush)
Image size
1240x1754px 198.3 KB
© 2008 - 2024 bolsterstone
Comments12
Join the community to add your comment. Already a deviant? Log In
Please, let it be ok for me to copy this imformation to a word doc, so I can do this off line. ??? What a great tutorial ! I hadn't thought to look here for ArtRage resourses until now. SO glad I did ! Thank You !!